
Action Blueprinting and Ignition System Work: What Most Gunsmiths Get Backwards
- Brandon Lolkus

- May 14
- 18 min read
Most rifles that come in with accuracy problems do not need a new barrel. They need the firing pin to strike the primer the same way every time. That is not what most customers ask for. It is not what most shops offer. It is the work that produces the largest accuracy gains on rifles that have already been accurized.
Action blueprinting is what customers think they need. Ignition system work is what actually drops their groups.
This post explains what action blueprinting actually involves at Redleg, what ignition system work means in practical terms, what each service costs, and the priority order that produces a rifle that holds its zero at distance. It also includes a documented bolt swap test from the shop bench that proves the ignition system thesis with photographic evidence.
👉 Before you commit to a blueprinting job, read this first: What Actually Makes a Rifle Accurate: A Complete System Breakdown

What Action Blueprinting Costs at Redleg
Here is the pricing first, so you know what you are looking at before you read further.
Action blueprinting: $200 to $400 depending on the action and scope of work
Lug lapping: $200 (separate service)
Gre-Tan firing pin and shroud assembly for Remington 700: approximately $80 parts
Firing pin sleeving: approximately $250
Bolt shroud truing: $100
A complete Remington 700 action and ignition system service package runs approximately $830 to $1,030 plus the Gre-Tan parts. Other actions vary based on what is required.
For context on where this fits in a complete custom build, see the full custom build cost breakdown.


What Action Blueprinting Actually Means
The term blueprinting gets used loosely. Some shops use it to describe lug lapping. Some use it to mean a basic receiver face truing. At Redleg, action blueprinting is a defined sequence of operations that addresses every mechanical surface where the action interacts with the bolt, the barrel, and the cartridge.
The action blueprinting work performed at Redleg includes:
Initial action evaluation to identify what needs correction
Setting up the receiver and bolt dialed in perfectly straight and true on the lathe
Truing the receiver face
Truing the lug seats
Straightening and truing the receiver threads using a single point method
Reducing bolt play by machining and installing bolt sleeves, or by the epoxy sleeve method
Bushing the bolt face to reduce the firing pin hole and reduce the firing pin tip diameter
Truing the bolt face
Smoothing and polishing the cocking cam
Opening the bolt shroud for positive firing pin travel
Correcting and modifying bolt timing
Smoothing and polishing the action for consistent operation
Silver soldering bolt handles where the original is damaged or being replaced
Correcting magazine and feeding issues where present
Time required: 2 to 4 hours depending on the action and what needs correction.
The most common problems found during action blueprinting evaluations at Redleg are uneven lug contact and a receiver face that is not square to the bore axis. Both are present on the majority of factory actions. Both directly affect accuracy. Neither is visible from the outside.
Actions blueprinted at Redleg include Remington 700, which is by far the most common, along with Bergara, Savage, Browning X-Bolt and A-Bolt, Tikka, and Weatherby.

Why Most Gunsmiths Get the Priority Backwards
Customers walk into shops asking for blueprinting because that is the term they have heard. The honest truth from a working gunsmith bench: blueprinting is necessary but not sufficient.
A rifle with a perfectly blueprinted action and an inconsistent ignition system will produce inconsistent results. The bolt will close the same way every time, the lugs will contact evenly, the headspace will be perfect, and the rifle will still throw fliers because the firing pin is not striking the primer with consistent energy and consistent timing on every shot.
This is the insight that separates a Redleg build from a basic accurizing job at a general gunsmith shop. The ignition system is what most shops never touch. It is also where the largest accuracy gains come from on a rifle that has already had basic accurizing work.
Brandon Lolkus trained directly under Gordy Gritters at Extreme Accuracy Institute. The diagnostic priority order taught in that program reflects what produces real accuracy gains in the field, not what sounds good in a marketing brochure. Ignition system work is first. Blueprinting follows. Lug lapping completes the action work. Bedding and barrel work happen in their own sequence after the action is correct.
The Correct Priority Order at Redleg
Ignition system work first. The bolt has to be trued and the firing pin channel sleeved before any other action work is performed. The ignition system has to be consistent before anything else matters.
Action blueprinting second. Receiver face, receiver threads, lug seats, and bolt face truing happen after the ignition system is corrected. The bolt is already set up in the lathe from the ignition system work, so the blueprinting flows from the same setup sequence.
Lug lapping third. Lugs are lapped in the cocked position, which is the position they sit in when the rifle is actually fired. Lapping in the uncocked position produces lugs that appear to have full contact on the bench but lose contact when the rifle is loaded and ready to fire. This is one of the most common mistakes general gunsmith shops make.
Bedding next. Once the action is mechanically correct, it can be bedded into the stock. Bedding before the action work is wasted effort because the action will be different after blueprinting and the bedding will no longer fit correctly.
Barrel work last. Chambering, threading, and crown work happen after the action is complete. The chamber has to align to a correctly trued action or the accuracy gains from a custom barrel are wasted.
Most shops do these steps in the wrong order. Some skip steps entirely. The order matters because each step depends on the previous one being correct.
What This Looks Like in the Real World: A Bolt Swap Test at Redleg
The cleanest way to prove the ignition system thesis is an A/B test where only one variable changes. We ran exactly that test at the shop.
A Remington 700 came in for evaluation. The rifle had already been fully blueprinted at Redleg. The action was trued, the receiver face was square, the lug seats were lapped, and the action was bedded into the stock. The barrel was chambered to under .0005 inch runout. By every conventional measure, this was a properly accurized rifle.
We had a second Remington 700 bolt that fit the same action. Headspace measured identical with both bolts installed. The only difference between the two was that one bolt had been through the full Redleg ignition system service. Firing pin sleeved. Bolt face trued. Gre-Tan firing pin and shroud assembly installed. Bolt shroud trued. Cocking cam polished. Firing pin travel verified at .020 inch or better, spring tension verified at 22 to 24 pounds.
The other bolt was a standard factory Remington 700 bolt. Untuned. No ignition system work performed.
Same rifle. Same scope. Same load. Same shooter. Same conditions. Only the bolt changed between strings.
👉 The full build story on this rifle: .30-06 Springfield Close Quarters Brush Gun


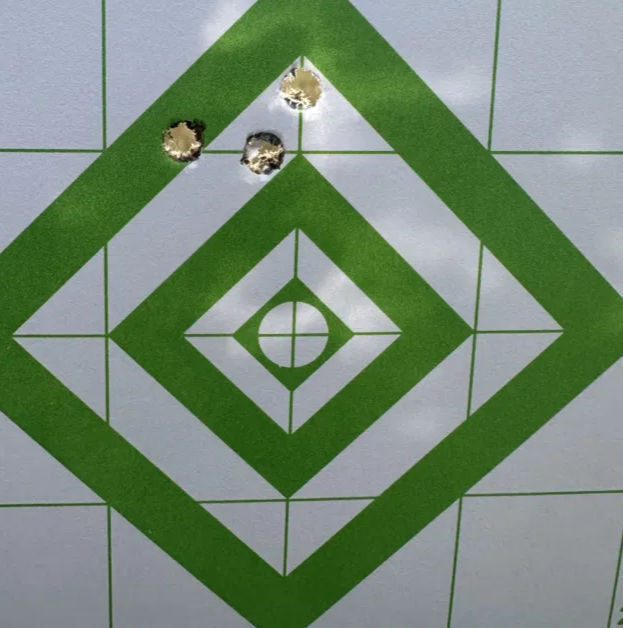
The result:
The tuned bolt produced a tight three round cluster, essentially one ragged hole, well inside half MOA.
The untuned bolt in the exact same rifle produced a group several times larger. The vertical and horizontal both opened up. The rifle was no longer doing what it was capable of doing. The only thing that changed was the ignition system.
The point of impact also shifted between the two bolts. The tuned bolt and the untuned bolt did not hit the same place on the target. This is a critical detail. The internal geometry differences between two bolts that pass headspace gauges can still produce different points of impact. Anyone interchanging bolts on the same rifle has to re-zero. This is not optional.

This is the proof. Blueprinting matters. Bedding matters. Barrel work matters. But if the ignition system is not consistent, none of the other work fully delivers what the rifle is capable of producing.
A safety note on this test: Swapping bolts between Remington 700 actions is not something to do casually. Headspace must be verified with proper gauges before any live fire. Bolts that appear to fit may have different lug timing, different firing pin protrusion, or different headspace dimensions that produce dangerous conditions when fired. The test we ran at Redleg was performed with verified headspace measurements and supervised conditions. Point of impact will also shift between bolts even when headspace is verified, so the rifle has to be re-zeroed for each bolt. Do not interchange bolts on your own rifle without a qualified gunsmith verifying headspace and safety.
👉 For a documented Remington 700 that went through this full accurizing sequence and now anchors a real dope card, see .270 Winchester vs 6.5 PRC.

What Ignition System Work Actually Involves
The ignition system is everything between the trigger pull and the primer strike. On a Remington 700 style action, that includes the cocking piece, the firing pin spring, the firing pin itself, the firing pin channel inside the bolt body, and the bolt shroud that contains the rear of the firing pin assembly.
Every one of those components has tolerance stack. Every one of them affects how the firing pin delivers energy to the primer. The cumulative effect is the difference between a rifle that prints quarter inch groups consistently and one that prints half inch groups with occasional fliers.

Three measurements matter for ignition system performance:
Firing pin travel: The target is approximately .020 inch of primer penetration when the firing pin strikes. The test is straightforward. Place an unloaded, primed case in the chamber. Lower the bolt gently while holding the trigger back so the firing pin contacts the primer without firing. Measure where the cocking piece sits. Then cock the action and pull the trigger to fire the primer. Without opening the bolt, measure where the cocking piece sits now. The difference is how far the firing pin penetrated into the primer. If the measurement is around .015 inch, the rifle may not misfire but accuracy will suffer because ignition is marginal.
Firing pin spring tension: The target at Redleg is 22 to 24 pounds of spring force in the cocked, fired position. A weak spring produces inconsistent strikes. A spring outside spec gets replaced.
Firing pin fit in the channel: The firing pin moves through a hole drilled in the bolt body. On a factory Remington 700, the firing pin has measurable play in that channel. The firing pin tip wobbles slightly as it travels forward. That wobble translates into inconsistent strike location on the primer. The fix is sleeving the firing pin channel to eliminate the play.
You can do the firing pin travel test on your own rifle at home. If your measurement is under .015 inch, your accuracy problem is probably ignition, not load, not optic, not barrel. That is the diagnostic that points you to where the actual work needs to happen.
The Remington 700 Specific Problems
Most factory Remington 700 actions have two specific ignition flaws that the factory ships and never addresses.
The firing pin bangs into the firing pin channel. Because the firing pin tip diameter is smaller than the channel, the pin shifts inside the channel during travel. This produces vibration and inconsistent primer strike force. The fix is sleeving the firing pin channel to a tight, concentric fit on the firing pin tip diameter.
The bolt shroud lock drags inconsistently. The shroud lock is the mechanism at the rear of the bolt that retains the firing pin assembly. On factory 700s, this part drags inconsistently against the cocking piece. Sometimes the drag is minimal. Sometimes it adds enough friction to slow firing pin travel measurably. Either way, the inconsistency translates directly into varying primer strike energy from shot to shot.

The quick fix for both is to remove the factory firing pin and shroud assembly and replace it with a Gre-Tan style firing pin and shroud designed for consistent, drag-free operation.

Firing Pin Sleeving Explained
Firing pin sleeving is the gunsmithing technique that eliminates play between the firing pin and the channel it travels through in the bolt body. The procedure involves drilling out the existing hole and inserting a bushing to create a tight, concentric fit on the firing pin.
There are several methods for creating the bushing. The most common uses an 8-40 or 1/4-28 fillister head screw, secured with Loctite or epoxy. The screw head is milled flush with the bolt face, and the hole is reamed to the specific diameter of the firing pin, typically .062 inch or .064 inch. Some gunsmiths use alloy screws with high yield strength around 170 KSI, or silver-soldered sleeves for maximum durability.
The critical requirement before any of this work is performed: the bolt body must be centered in the lathe and runout must be under .001 inch before cutting the threads for the bushing. If the bolt is not running true, the new bushing will introduce firing pin drag rather than eliminate it. The bolt has to be set up correctly first or the modification makes the problem worse instead of better.

Bolt Shroud Truing
The bolt shroud is the final ignition system component. It contains the cocking piece and rides against the rear of the bolt body. If the shroud is not square to the bore axis, the cocking piece travels at a slight angle, which introduces uneven force on the firing pin during the trigger pull.
Bolt shroud truing squares the contact surfaces between the shroud and the bolt body so the cocking piece travels in a perfectly straight line. The work takes 30 to 45 minutes on a lathe with appropriate fixturing.
This is the service most shops skip even when they do other ignition work. It is the finishing step that turns a good ignition system into a consistent one.
Receiver Threads and the Single Point Truing Method
Factory receiver threads are rarely perfectly square to the bore axis. The barrel screws into these threads. If the threads pull the barrel slightly off center, every accuracy gain from a custom barrel gets compromised.
The single point thread truing method runs the lathe with the compound set 30 degrees to the left for the internal thread. Dykem layout fluid coats the threads so the cutting bit can be seen advancing. The procedure cuts the front side of each thread first, advancing .001 inch per pass, until the upper half of the front face is cutting clean the full length of the thread.
The critical insight: once the front side is true, the bit never touches the front side again. The back side gets cleaned up afterwards. If the bit touches the front side while working on the back side, any unevenness in the back side will flex the tool bit and dig into the front side, destroying the trueness already established.

Recoil Lug Upgrades
The Remington 700 factory recoil lug is .250 inch thick. It is heavy enough for factory hunting use but limits the contact area between the barreled action and the stock bedding. Heavier aftermarket recoil lugs increase that contact area, which reduces flex under recoil and improves accuracy on bedded rifles.
The Precision Armament Accu-Lug is one of the oversize lugs used on builds at Redleg when the rifle warrants the upgrade.

What Most Shooters Get Wrong About Blueprinting
Mistake 1: Asking for blueprinting without ignition system work. A blueprinted action with the original factory firing pin assembly is an improvement over a stock action but it is not what the customer thinks they are getting. The flier problem usually traced to blueprinting needing to be redone is almost always an ignition system problem that was never addressed.
Mistake 2: Assuming lug lapping equals blueprinting. Lug lapping by itself is a $200 service. It is not blueprinting. A shop that quotes $200 for blueprinting is quoting lug lapping and calling it something else.
Mistake 3: Assuming a factory action does not need blueprinting. Even premium factory actions like Bergara and Tikka benefit from blueprinting. The factories produce these actions to a price point that does not include the time required for full truing. Custom actions like Defiance, Bighorn Origin, and Stiller arrive much closer to true from the factory and require less corrective work, but they are not free of stack tolerance either.
Mistake 4: Skipping the bolt face bushing. Reducing the firing pin hole diameter to match the firing pin tip diameter eliminates gas blowback issues and improves primer strike consistency. Many shops never address it.
What Redleg Sees in the Shop
Brandon Lolkus is the owner of Redleg Company, a precision rifle gunsmith based in Chandler, Minnesota. Redleg operates under a Type 7 FFL with Class 2 SOT. Brandon holds a gunsmithing and machining degree from Pine Technical College and trained directly under Gordy Gritters at Extreme Accuracy Institute, where the action blueprinting and ignition system methodology used at Redleg was learned. Gordy's instructional materials and DVDs through Extreme Accuracy Institute remain a reference for the procedures performed at Redleg. Brandon is a combat veteran, U.S. Army National Guard, retired.
Every barrel chambered at Redleg runs to under .0005 inch runout, a benchrest standard most production shops cannot match. Every action that goes through blueprinting at Redleg gets the full sequence above, in the correct order, with the ignition system addressed first.
Redleg ships completed builds and service work nationwide. Current build wait is 8 to 10 weeks once parts are in.
What These Numbers Mean on Paper
A rifle with a Remington 700 action that has been fully blueprinted and ignition system corrected at Redleg should produce single digit standard deviation on velocity, consistent primer strikes with no light strikes or misfires, and group sizes limited by the barrel, the bedding, the optic, and the shooter rather than by the action.
A rifle that comes in with consistent vertical stringing, inexplicable fliers, or velocity ES numbers above 25 frequently has an ignition system problem that no amount of load development will fix. The diagnostic at Redleg starts with the borescope and the ignition test before any load work is recommended.
👉 If your rifle is showing accuracy problems, the diagnostic comes first: Why Your AR Won't Cycle and What to Do About It covers the same diagnostic discipline for AR platforms.

👉 For the bedding work that happens after the action is correct: Pillar Bedding a Rifle: A Master Gunsmith's Guide

Frequently Asked Questions
What is the difference between action blueprinting and lug lapping? Action blueprinting is the full sequence of receiver and bolt truing operations, including receiver face, receiver threads, lug seats, bolt face, and ignition system components. Lug lapping is one specific operation within that sequence, focused on achieving 50 percent or greater contact between the bolt lugs and the lug seats with the bolt in the cocked position. At Redleg, blueprinting is $200 to $400 and lug lapping is $200 as a separate service.
How much does action blueprinting cost? At Redleg, action blueprinting is $200 to $400 depending on the action and scope of work. A complete Remington 700 action and ignition system service package including blueprinting, lug lapping, firing pin sleeving, Gre-Tan firing pin and shroud assembly, and bolt shroud truing runs approximately $830 to $1,030 plus parts. Other actions vary based on what is required.
Do I need blueprinting if I have a custom action? Custom actions from manufacturers like Defiance, Bighorn Origin, Impact Precision, Stiller, and Mausingfield arrive much closer to true than factory actions. Most still benefit from at least bolt lug lapping and an ignition system check. Full blueprinting on a high quality custom action is usually not required but is still available.
How long does action blueprinting take? 2 to 4 hours of bench time on most actions. The total turnaround time depends on shop schedule. Current Redleg lead time is 8 to 10 weeks.
Does blueprinting void my factory warranty? On factory rifles, yes. Modifications to the action void manufacturer warranties. Customers bringing in factory rifles for blueprinting should understand they are giving up factory warranty coverage in exchange for the accuracy improvement.
Can blueprinting fix a rifle that is already shooting poorly? Sometimes. It depends on what is causing the accuracy problem. If the problem is in the action, blueprinting will help. If the problem is in the barrel, the bedding, the optic, or the load, blueprinting will not fix it. A diagnostic evaluation at Redleg identifies what is actually causing the accuracy problem before recommending work.
Why does the ignition system matter so much? A rifle that delivers inconsistent firing pin energy to the primer produces inconsistent ignition. Inconsistent ignition produces inconsistent velocity. Inconsistent velocity produces vertical stringing at distance. The ignition system is the variable most shops never address because it requires specific tools, specific training, and a lot of bench time. The Redleg bolt swap test documented above shows the result. Same rifle, same load, same shooter. The tuned bolt produced a sub half MOA cluster. The untuned bolt opened the group significantly.
What is the Gre-Tan firing pin and what does it do? Gre-Tan Rifles produces precision firing pin and bolt shroud assemblies designed to replace the factory components on Remington 700 actions. The Gre-Tan parts eliminate the bolt shroud drag and firing pin channel slop that produces inconsistent ignition on factory 700s. The assembly is approximately $80 in parts. Installation at Redleg includes truing the bolt body and verifying firing pin travel and spring tension are within spec.
How do I know if my rifle has an ignition system problem? Run the firing pin travel test. With an unloaded, primed case in the chamber, fire the primer and measure how far the firing pin penetrated into the primer. .020 inch or more indicates good ignition. .015 inch or less indicates marginal ignition that is probably affecting accuracy. ES and SD numbers on a chronograph also tell the story. ES consistently above 25 on a quality load is often an ignition problem.
Can I swap bolts between Remington 700 rifles myself? Not safely without verifying headspace with proper gauges first. The bolt swap test described in this post was performed at Redleg with verified headspace measurements on both bolt configurations before any live fire. Bolts that appear to fit may have different lug timing, different firing pin protrusion, or different headspace dimensions that produce dangerous conditions. Point of impact will also shift between bolts even when headspace is verified. Do not interchange bolts on your own rifle without a qualified gunsmith verifying headspace and safety.
Ready to Get the Work Done Right
Bring it in, ship it in, or call to discuss what your rifle needs. Diagnostic evaluations start with what the rifle is actually doing on paper and what the borescope and ignition test reveal. Redleg ships completed builds and service work nationwide.
📞 507-677-6007 📧 info@redlegguns.com
Which article brought you here? Tell us when you call.
Last updated: May 2026. Pricing and service descriptions reflect Redleg Company shop rates as of this date. Action blueprinting methodology learned under Gordy Gritters at Extreme Accuracy Institute. Specific work performed on each rifle depends on diagnostic evaluation. The bolt swap test documented above was performed at Redleg Company in Chandler, MN with verified headspace measurements and supervised conditions.


Comments